
Advice
In order to realise the land reclamation, a number of questions need to be answered.
There are several possibilities to build an artificial island.
But in order to get this far, many aspects have to be considered.
With this as a baseline, the following main question is asked:
What does the implementation phase of artificial island 2 look like here, taking into account erosion and waves?
With this as the main question, the following four additional questions are asked to support the research:
- In which season can the best start with the spraying of the artificial island?
- Which part of the island should be moored/sprayed first?
- How is the island protected against waves?
- How can you keep erosion to a minimum as a result of wave transfer?
Phases
To ensure that the island can be built successfully. The project will be divided into several phases. Several phases will be added up and then one will be selected. In order to be able to make a choice, we will look at: technical feasibility, sustainability and logistics.
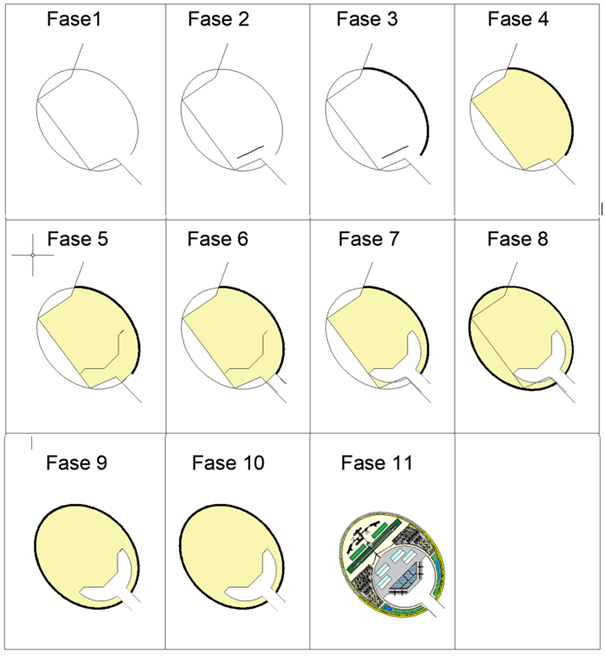
The chosen phasing consists of 11 different phases. A temporary sheet pile wall will be placed to block the flow. This will ensure that as little sand as possible is washed away, thus saving both time and money. In addition to a temporary sheet piling, a temporary harbour will also be used, consisting of an arrangement of floating pontoons. The phasing consists of 11 phases.
See the phases below:
Phase 1
In phase 1, temporary sheet piling is installed. This is to block the flow and to prevent the sand from being washed away.
The temporary sheet piles are not driven in in a straight line but at an angle. This is to ensure that the sheet piles do not have to be moved again, thus saving time and money. The temporary sheet piles must be at least 30 metres long as the seabed is at a depth of approximately -20 metres. An AZ profile type will be used for this.
Phase 2
Because the combi walls will not be placed wet, a temporary harbour will be used. The temporary harbour consists of an arrangement of floating pontoons. The pontoons will be brought to the location with a tugboat. These are provided with bollards and can be used for: The installation of sheet piles, the transport of goods, dredging and temporary storage. The pontoons have a length of 55 metres. There will be 15 pontoons in use.
Phase 3
In phase 3 the soft seawall will be constructed. The soft seawall will also be constructed under a slope of 1:20.
Phase 4
The inside of the island will be sprayed up to the desired height of +5 NAP. The place where the port will be
located will also be raised to a height of approximately +5 metres. This will allow the combi wall for the port to be
applied dry.
Phase 5
In phase 5, the pontoons will be moved. They will be positioned at the location where the breakwater will be constructed. The combi-wall will be installed from ground level. Combi-wall is a wall that consists of both sheet piling and tubular piles. The tubular piles provide a higher strength and stiffness than would be the case if only sheet piles were used. The tubular piles are provided with locks to which the sheet piling profiles connect before installation. Once all the pipes have been put in place, the gaps between them can be filled with ordinary Z or U sheet pile profiles. A combi wall with tubular piles is many times stiffer than the heaviest type of sheet piling. For the construction of the quay wall, a Z sheet pile profile will be used.
Phase 6
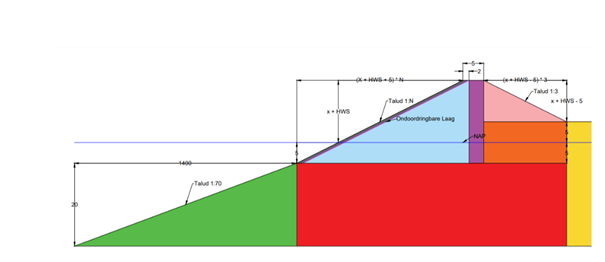
In this phase, the breakwaters will be constructed using floating pontoons. A cross-section of the final design of the breakwater is shown in figure 1. At 21.13 metres, the total height of the breakwater is higher than the calculated crest height of 20.50 metres. This height difference is caused by the differences in shape between Xbloc and Xbloc+ elements. The top of the Xbloc+ elements on the crown are situated at a height of 20.50 metres, but because the Xbloc elements are 63 cm higher than the Xbloc+ elements, the final crown height is 21.13 metres.

Phase 7
The harbour is dredged and dredged to a correct depth of -15 meters. Using a trailing suction hopper dredger, the port will be dredged to the correct depth.
Phase 8
In this phase, the hard seawall is applied. The hard seawall will be installed under a slope of 1:70. Thanks to the temporary sheet piling, the sand that has been sprayed will not wash away. This saves time and money. (See figure 2)
Phase 9
The sheet piles are pulled out vibrating. The temporary sheet piles can be reused.
Phase 10
In phase 10 the geotechnical aspects, such as the settlements, are examined. To speed up the consolidation process, extra sand may be used as a preload. When the time comes, the site will be ready for construction. (see figure 3)
(The sealed square aluminium container is filled through the two plastic pipes. The receptacle is linked to a reference receptacle with a constant water pressure. The pore pressure gauge on the receptacle (between the hoses) is connected to a logger box and can be read out online.)

Phase 11
In this phase, all facilities will be placed such as: airport, recreational objects, sleeping places, restaurant, etc.
On the basis of the multi-criteria analyses, it can be concluded that the phasing 1 has come out of the test better. This is due to the temporary port, in which goods and materials can be stored in the pontoons. This means that fewer ships have to sail to the island to provide the personnel with all the necessary equipment. This reduces considerable fuel consumption of ships and therefore less CO2 emissions. The use of a temporary sheet piling ensures that less sand is washed away and therefore less sand needs to be sprayed. If a temporary port was not used, it would take a relatively long time to make use of the port. This is because first the combi walls have to be placed wet and then sand has to be sprayed. It takes a relatively long time and therefore phasing 1 is the best option.
Visualisation
Create Your Own Website With JouwWeb